Speaker Installation in a 2000 Trooper S for Dummies by A Dummy
Front
1- Pry the plastic grill off with a skinny flat tip screwdriver, from below works best for me.
2- Unscrew the three screws securing the speaker and pull the speaker out but do not disconnect it yet.
3- Look at the speaker from the rear and identify the (-) and (+) wires. The signs will be marked right above the
connectors on the little white cardboard base. Additionally the (+) will be marked with a green dot. Write down the
color of the wires attached to the (-) and (+) for future reference.
4- Disconnect the speaker from the wires by pulling on the plastic plug attached to the wires.
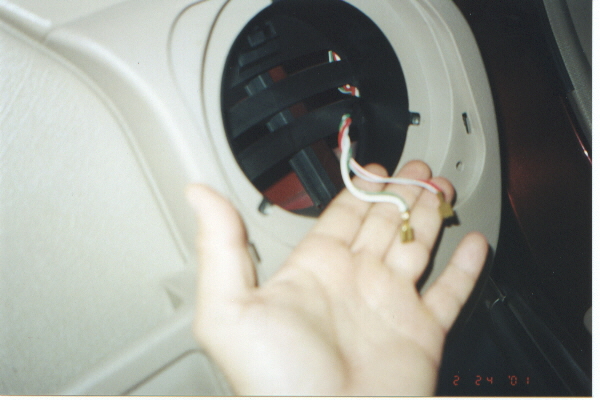
5- We now need to remove the plastic plug/cap from the wires hanging out the speaker opening, there should be no
need to cut those. Using a very small, flat-tip screwdriver, insert the blade in the plastic plug, between the blade
connector and the little plastic 'bump' securing the blade to the plug. If you look inside the plastic plug right down
the wire to the blades you'll see it. Push the screwdriver's blade in as far as it will go and now gently tug on the
wire. It should come out without much trouble and you should end up with wires ready to plug into your new
speakers. I'll post a picture in the Photo gallery.
Here's the picture:
6- Leave the wires dangling and check for the new speaker's fit in the opening and for screw hole alignment. The
Polk 602s I installed were a bit deeper than the stock speakers, but using the thick rubber gasket they came with
as a spacer (between the plastic speaker opening and the rear of the speaker) I got them to fit without having to cut
the black plastic strips in the back of the speaker opening. You can see these strips in the picture also.
7- The Polks, as do many speakers, identify their polarity by the width of the connector blades: the fat blade is (+),
the skinny blade is the (-). Connect the appropriate wires to the connectors now.
8- If you are using the Polk rubber spacer ring, the stock screws will be too short, use the longer ones that came
with the new speakers, they fit just fine in my case. Align the holes you marked out in step 6 and screw the
speaker in without overtightening.
9- Pop the grill back in and check for a good, tight fit. If you have it, you're done! Enjoy the music.
Rear
1- Pry the plastic grill off with a skinny flat tip screwdriver, from above works best for me.
2- Unscrew the four screws securing the speaker and pull the speaker out but do not disconnect it yet.
3- Follow steps 3, 4 and 5 above.
4- Leave the wires dangling and check for the new speaker's fit in the opening and screw hole alignment. The Polk
402s I installed were a direct fit, you should have no problems with deeper speakers here.
5- Connect the wires to the corresponding connectors on the speaker.
6- Align the holes you marked out in the previous step and screw the speaker in without overtightening.
7- Pop the grill back in and check for a good, tight fit. If you have it, you're done!
Rear Appendix for 5.25" Speaker Install:
The holes to be drilled are new screw holes
in the pillar. (You actually drill thru some thin plastic and then the
metal pillar.) The screw holes on my 95 are 4.5 inches apart to
accommodate the stock speakers, but the Alpines require holes 5.25 inches
apart. I drilled the new holes at roughly the 2, 4, 8 and 10 o'clock
positions to orient the Alpine speaker correctly. I think I used a 1/8
inch bit to suit the small screws included with the Alpines.
You do NOT have to modify the
size of the cutout to fit the speaker itself. It fits fine with respect to
both diameter and depth. And yes, it all fits beneath the stock speaker
grill.
It is a very easy job but makes a huge difference in sound. I can't believe I listened to those wimpy 4-inch speakers for so long! And for the price (under $60) the Alpines are a bargain compared to the $79 Polk 402's.